Chatty's redesigned avatars are more 3D-like, so every accessory needs to be
re-positioned. This editor lets you do it visually, save your changes
automatically, and propagate one good placement to many similar accessories
or many avatars in one click.
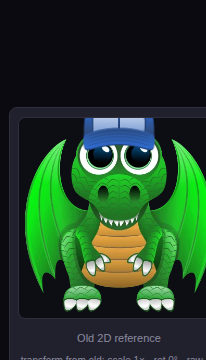
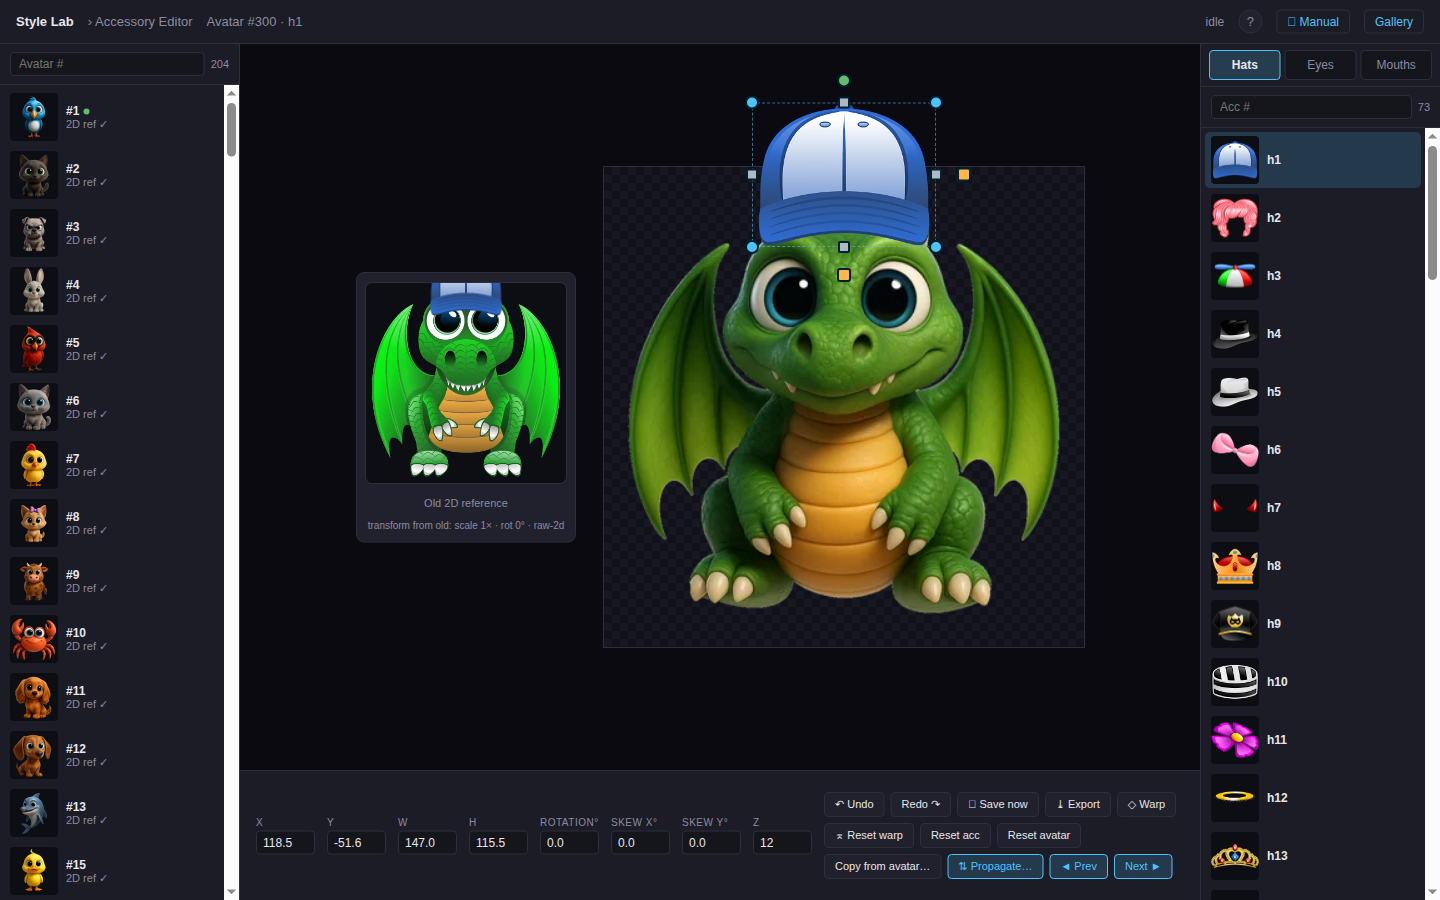
The editor at a glance: avatars on the left, the stage in the middle with the OLD 2D reference next to it, accessory list on the right, and the action toolbar at the bottom.
Workflow:
Open the editor and
sign in with the username and password (or contributor code) you were
given.
Pick an avatar in the left rail — scroll, or just start
typing its number or its name in the filter box (see §3). Pick an
accessory in the right rail (Hats / Eyes / Mouth / Neck / Body tabs), or
type its name to find it across every category at once.
Position the first hat (or eye, or mouth) so it looks as
close to the 2D original — shown in the small reference panel beside the
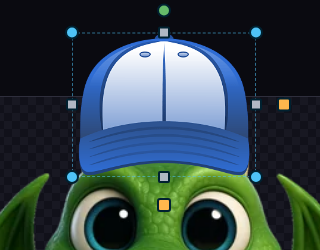
stage — as you can. Drag the bbox to translate, the corner / edge handles
to resize, the green dot above the box to rotate, the yellow squares to
skew.
Blue corner circles = resize · grey edge squares = resize one axis · green dot = rotate · yellow squares = skew · drag the dashed bbox itself to move.
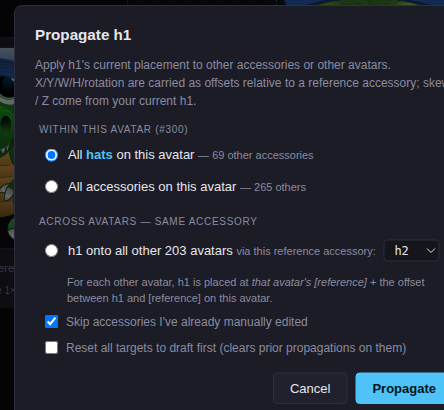
Press the Propagate button
and pick All hats (or All accessories):
Within-this-avatar scope copies the relative offsets between accessories on the OLD 2D map onto your new anchor.
The relative offsets between accessories on the OLD 2D avatar are
preserved and shifted onto your new placement. Most accessories land
correctly automatically. Then click through them quickly to spot-check
and tweak the few that look off.
Auto-save. Every change is written to Firestore ~800ms after
you stop editing. The save status indicator in the header shows
idle / editing… / saving… /
saved ✓. You can also press
💾 Save now to flush immediately, or
⤓ Export to download a JSON backup.
2. The layout
Left rail · the green dot means this avatar has saved edits.Reference panel · the OLD 2D combo at its baked position — your visual target.
Header (top): project name, breadcrumb, the action
toolbar (icon buttons grouped by function — see §5), the ◄ ► category
arrows, the "looks done" pill (only shown when every wizard anchor is
placed), save status, the help popover (? button), the
Review link (approvers only — see §10),
📖 Manual link, back to gallery.
Left rail: avatar list with thumbnails (each tile shows
#number · name) + a filter input. Type a number or part
of a name to jump (see §3). A small green dot next to an avatar means it
has saved edits.
Stage (center): 480×480 preview with the avatar +
accessory rendered. Manipulation handles overlay the accessory's bounding
box.
Reference panel: 200×200 view of the OLD 2D combo at its
original baked position — your visual target.
Right rail: category tabs (Hats / Eyes / Mouth /
Neck / Body / Bottom) + an accessory list, plus a filter box that
searches by number or name across every category at once (see
§3). Greyed-out entries with "(no draft pos)" are accessories that have
no production placement — see §12.
Bottom toolbar: the "Editing Avatar #N · acc" label
and the eight numeric x/y/w/h/r/sx/sy/z fields. (Action buttons live
in the header now — see §5.)
Numeric fields. Enter commits; each typing session is one undo entry.
3. Finding things fast — search by name
Both rails have a filter box at the top. You no longer have to remember
numbers — type a name and the list narrows as you type.
Avatars — by number or name
Typing dragon in the left-rail filter narrows the
avatar list to every dragon. Each tile shows #number · name, so you
can confirm you picked the right one.
Type a number — 30 matches #30,
#300, #301… — or part of a
name (dragon, cat,
phoenix).
Matching is case-insensitive and works on any part of the name.
Clear the box to see the whole list again. The state filter
(⚫/🟡/🟢/✓) still applies on top of the name filter.
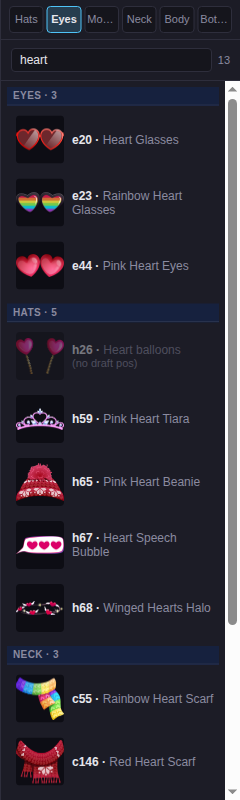
Accessories — one search across every category
Searching heart in the right rail surfaces matches
from every category at once — Eyes, Hats, Neck, Body — under sticky
category headers. The accessories in your current tab are listed
first.
The accessory filter is cross-category: it no longer
limits you to the open tab. Type crown, glasses,
heart and you'll see hits from Hats, Eyes, Mouth, Neck, Body
and Bottom together.
Results are grouped under a category header
(EYES · 3, HATS · 5, …) so you know where each match lives. The tab you're
currently on is shown first.
Clicking a result jumps straight to it and switches to its category — no
need to find the right tab yourself.
You can still search by number here too — 5
matches h5, h15, h50…
Tip. The ◄ ► arrows in the header (and the ← /
→ keys) step through accessories and now wrap across
categories — when you reach the end of Hats they continue into the next
category instead of stopping. See §6.
4. Manipulating the accessory
The dashed bounding box shows the accessory's rectangle. Around it are
several handles, each with its own job:
Handle
What it does
blue circles in the corners
Resize. Drag both width & height. The off-axis
dimension auto-locks once the drag clearly favors one direction.
Hold Shift to lock the original aspect ratio.
grey squares on the edges
Resize one dimension only — top/bottom changes only
height, left/right changes only width. Anchors the opposite edge.
green dot above the box
Rotate. Hold Shift to snap to 15° steps.
yellow square (right side)
Skew X. Drag horizontally → top & bottom edges
slide left/right relative to each other. Now uses object-local
coordinates so it's predictable when the accessory is rotated.
yellow square (below)
Skew Y. Drag vertically → left & right edges
slide up/down relative to each other.
Drag the body of the bbox
Translate — move the accessory anywhere on the stage.
Numeric inputs at the bottom (X / Y / W / H / Rotation / Skew X / Skew Y / Z)
let you type exact values. Enter commits. Each numeric edit
becomes a single undo entry, even if you typed multiple keystrokes.
5. Toolbar — every button explained
The action toolbar lives in the header, grouped by function. Every icon
has a tooltip on hover (including its hotkey, when there is one). Press
? to open the cheatsheet popover that lists every icon's
meaning at a glance.
Button
What it does
↶ /
↷ · Ctrl+Z / Ctrl+Y
Undo (Ctrl+Z) / Redo
(Ctrl+Y or Ctrl+Shift+Z) the last edit. One
drag gesture or one field-typing session = one undo entry. The
stack works across avatars and accessories — undo navigates you
back to whatever you edited.
💾 · S
Save now. Force-flushes any pending edits to
Firestore immediately, bypassing the 800ms debounce.
⤓
Export. Downloads coords_3d_{timestamp}.json
— the full coord map for every avatar in 384-px space. Use as a
backup or to hand off to the iOS team.
◇ · W
Warp toggle. While active (button turns yellow),
the four corner handles drag corners independently — turning the
rectangle into any quadrilateral. See §8.
◇×
Reset warp. Removes the warp on the current
accessory only — back to a plain rectangle.
↺ · R
Reset current accessory to its draft seed
position. Saved override is removed; Ctrl+Z brings it
back.
↺…
Reset more — scoped. Opens a modal where you pick
the scope: All Hats, All Eyes, All Mouths,
or Entire avatar. Each option shows how many overrides
it would clear; disabled if there's nothing to reset.
🧙
Wizard. Opens a scope picker — All,
Hats only, Eyes only, or Mouths only.
A "Wipe before starting" checkbox optionally clears the chosen
scope first. The wizard then walks you through placing the
anchors and propagating. The full sequence has 4 steps; scoped
runs short-circuit to "Done" after their category finishes.
✓ · D
Mark this avatar complete (toggles). Once marked,
the wizard stops auto-starting for it. When every wizard anchor
is placed but the avatar isn't yet marked done, the button gets
a green ring and a small "✓ ready · click to mark done" pill
appears in the header.
⎘
Copy from avatar…. Replaces all accessory
positions on the current avatar with another avatar's. Useful
when two avatars have the same head shape.
⇅ · A
Propagate…. The big timesaver. Apply the
current accessory's placement to other accessories on the same
avatar, or the same accessory across all other avatars. Full
details in §7.
⊞
Quick preview. Opens a scrollable grid of every
accessory composited on the current avatar at 72×72. Tabs filter
All / Hats / Eyes / Mouth / Neck / Body. The currently-edited tile has an
accent ring; tiles with saved overrides have a green dot. Click
any tile to jump straight to editing that accessory.
◄ /
► · ←→
Prev / next accessory. Steps through the current
category and wraps into the adjacent category when
you reach the end — e.g. past the last Hat it continues into Eyes,
so you can walk every accessory without switching tabs by hand. Use
↑ / ↓ to move between avatars while keeping the
same accessory selected.
Session is remembered. The editor saves the last
avatar + accessory you were editing to your browser's localStorage.
When you reload (Ctrl+R or Ctrl+Shift+R), it
reopens exactly where you left off — no more landing on Avatar #1 / h1
every time.
6. Keyboard shortcuts
The hotkeys are split by hand and purpose: WASD triggers
common toolbar actions, arrows handle navigation,
brackets handle rotation, and R resets. The right hand stays
on the mouse for positioning while the left hand drives the editor.
Action keys — WASD
W
Toggle Warp mode (same as the ◇ button).
A
Apply / Propagate — opens the propagate modal (⇅).
S
Save now — flushes any pending edits (💾).
D
Mark Done — toggles the avatar's complete flag (✓).
Editing
Rotate clockwise / counter-clockwise
] / [
Scale up / down
+ / -
Reset current accessory to draft
R (instant; Ctrl+Z to undo)
Pixel-precise nudging is easier through the numeric X / Y fields in the
bottom toolbar — type the new value and press Enter. Each
numeric edit is one undo entry.
Navigation — arrows
Previous / next accessory — wraps into the next category at the end
← / → (also p / n)
Previous / next avatar — keeps the same accessory selected
↑ / ↓
Wizard primary button (Done with X · Propagate · Close)
Enter
The ↑ / ↓ shortcut is great for spot-checking how
one accessory sits across many avatars: pick h1 on avatar 1,
then hold ↓ to flip through 2, 3, 4… while keeping the same
hat selected.
Other
Undo / Redo
Ctrl+Z / Ctrl+Y (also Ctrl+Shift+Z)
Toggle the cheatsheet popover
? (or click ? in the header)
7. Propagation — saving hours of work
Propagation is what makes the editor practical. After you've placed
one accessory carefully, you can roll that placement out to
many others, preserving the differences each accessory had in the original
2D layout.
Propagate modal: choose a within-avatar scope or a cross-avatar scope, with a reference dropdown for the latter.
Within this avatar
Place the first hat well. Then click ⇅ Propagate…
and pick All hats on this avatar. The editor takes the relative
offsets between every other hat and the anchor hat in the OLD 2D map, then
applies those same offsets to your new anchor position. Result: every hat
lands somewhere sensible automatically. Same for eyes and mouths.
Skew, Z, and rotation are carried as relative offsets too — so an
accessory that was tilted in the old map (e.g. the rainbow scarf
c54 at -30°) keeps its tilt after propagation.
Across avatars — same accessory
Place an accessory (e.g. c36 — one with no draft position) on
one avatar. Then propagate across avatars: pick a reference
accessory (e.g. c1) that's already positioned on every other
avatar, and the editor places c36 on each one at
that avatar's c1 position + the offset between c36 and c1 you set
here. Effectively this teaches the editor where c36 goes by
comparing to one anchor we trust.
The two checkboxes
Skip accessories I've already manually edited —
protects your hand-tuned placements from being overwritten by this
propagation. Default ON.
Reset all targets to draft first —
drops every saved override on the targets in scope before applying.
Use this when previous propagations from different anchors have
stacked weird quirks (e.g. unintended skew from one anchor that's
now polluting all targets).
Tip. If you propagate from c1, then later
propagate from c2, the second propagation overwrites whatever
the first wrote. To avoid surprises after multiple rounds, use
Reset all targets to draft first + tweak only one anchor per round.
8. Warp / perspective
Some accessories need to follow the avatar's gaze or head angle —
not just rotate, but perspective-distort. The Warp feature solves this.
Click ◇ Warp. The button highlights.
The four corner handles change behavior.
Drag any corner anywhere — independently of the others. The accessory
becomes a free quadrilateral.
Click ◇ Warp again to leave warp mode
(corners go back to resizing).
Click ⌅ Reset warp to undo a warp on the
current accessory.
Internally the editor solves a 4-point homography from the un-warped rectangle
to your quad and emits a CSS matrix3d on the image. The result
composes correctly with translate, rotate, scale and skew, so you can stack
effects.
Propagation carries warp through, so one well-warped accessory's perspective
copies to its targets.
9. In-app preview & the iOS renderer
The stage shows how the accessory sits in the editor. But what
designers really need to know is: will it look the same inside the
iOS app? Two tools answer that.
The in-app preview panel
The preview panel renders the current avatar + accessory the way
the app composites it, and reports how much the accessory was scaled to fit
(e.g. "shrunk to 49%"). The ↗ Compare in iOS app button is
at the bottom.
This panel mirrors the app's compositing rules, so if an accessory is being
scaled down hard or clipped, you'll see it here before it ever ships.
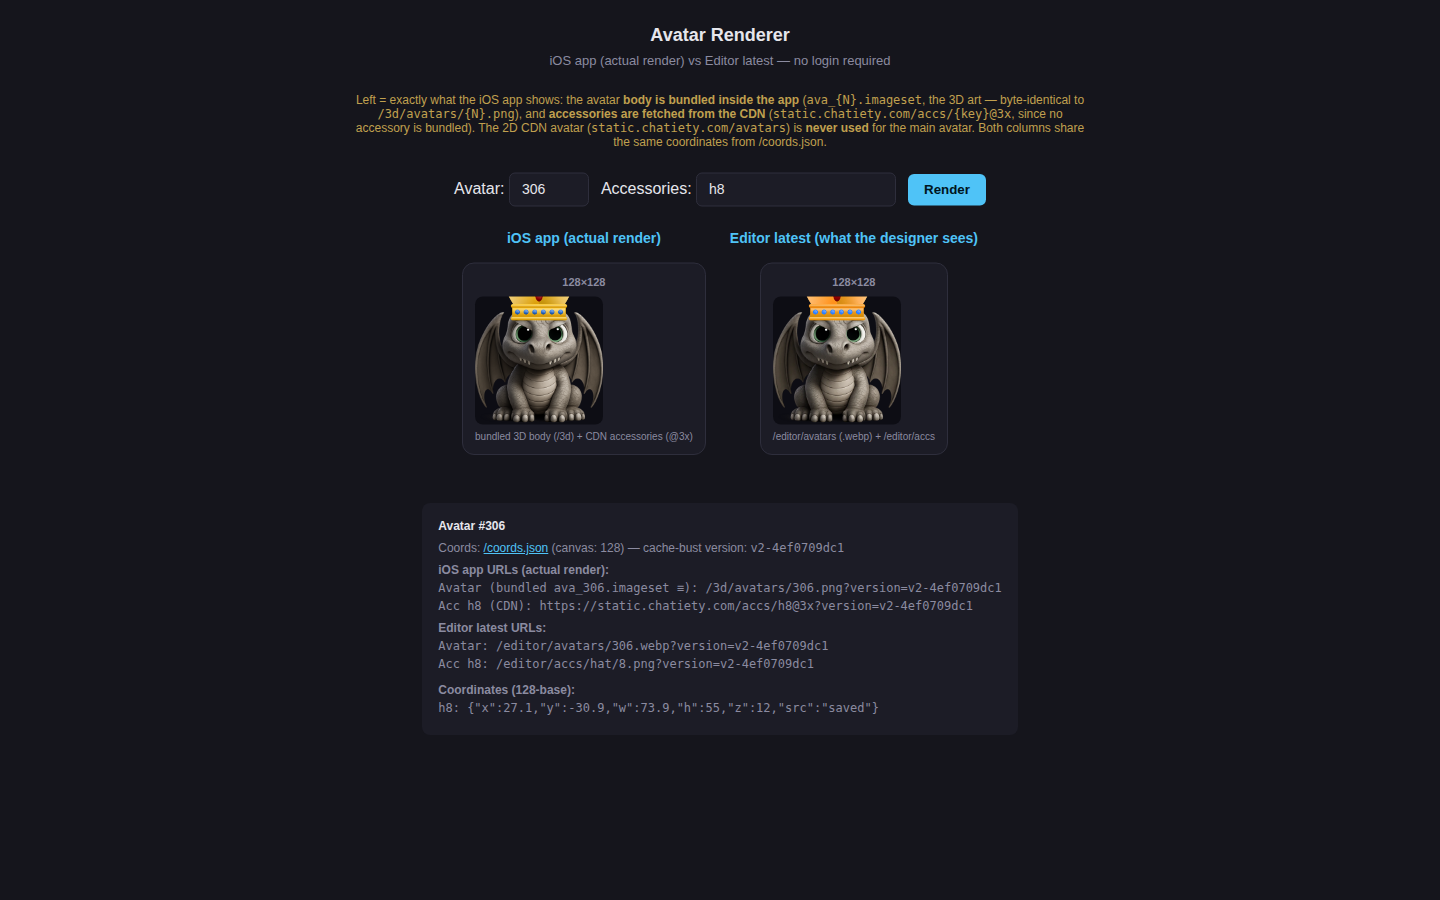
↗ Compare in iOS app — the renderer
Click ↗ Compare in iOS app in the preview
panel. It opens the renderer in a new tab for the
exact avatar + accessory you currently have on screen. This is the
fastest way to confirm the iOS app build is in sync with the Editor.
The renderer shows two columns side by side: iOS app
(what the shipped app bundle + CDN serve) and Editor latest
(your current placement). If the two columns match, the app is up to date;
if they differ, the app hasn't picked up the latest coordinates yet.
The button is enabled as soon as an avatar is selected. With no accessory
picked it shows just the avatar; with one picked it shows
avatar + that accessory.
The renderer URL encodes the selection
(/renderer/306,h8 = avatar 306 with hat 8), so you can copy
the link and share an exact comparison with the iOS team.
If the columns don't match, the iOS app simply hasn't shipped the newest
coordinate map yet — flag it to the engineer who pushes the app build.
10. Review workflow — for approvers
Every edit a contributor makes is submitted as a proposal,
not written straight to production. Approvers (admin / design / support / QA
roles) see a Review link in the header with a count of how
many proposals are waiting.
Header toolbar: the ◄ ► category arrows on the left, and the
Review, Manual, Improver
and HQ links on the right. The number next to Review is the
pending-proposal count.
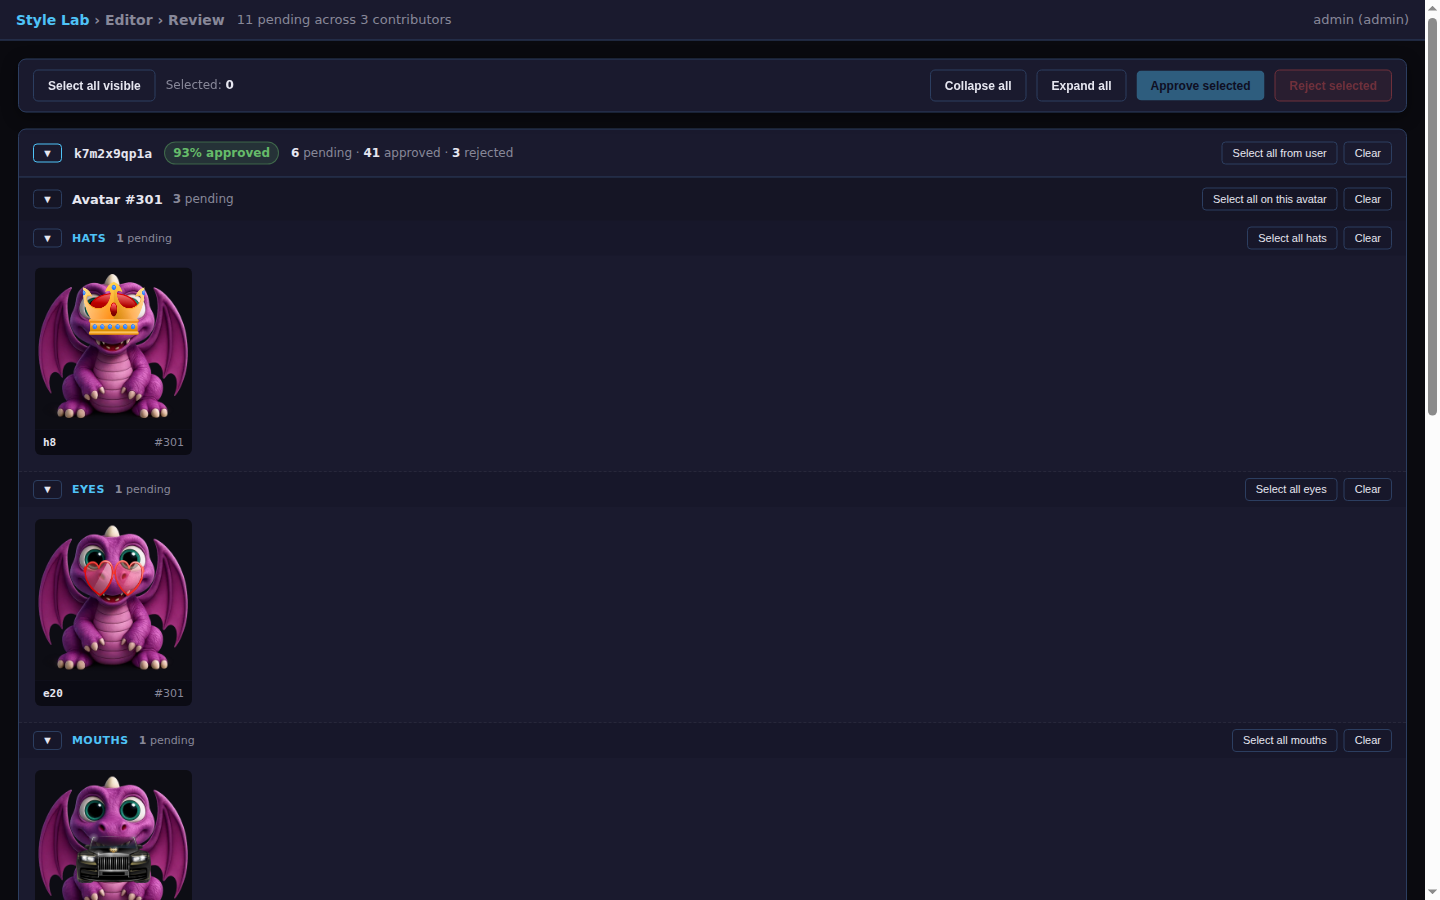
Open Review to see proposals grouped by contributor, with an
approval rate and pending / approved / rejected counts for each.
A contributor expanded: their stats at the top, then their pending
placements laid out per avatar and category (Hats / Eyes / Mouths) so you
can eyeball every one at a glance.
Expand a contributor to lazy-load their pending
proposals. Each tile renders the avatar with the proposed accessory at the
submitted position.
Approve a placement to write it into the production
coordinate map. The contributor is notified and that accessory locks for
them (they can re-open & re-submit if they want to change it later).
Reject a placement to send it back — the contributor sees
the rejection, the rejected position is reloaded for them to adjust, and
they can re-submit.
Approving edits also unlocks more avatars for that
contributor, so good work earns a wider scope automatically.
Contributors: you won't see the Review link — instead you get
a "Contributor mode" pill and a Submit avatar for review
button. Place your accessories, then submit; an approver takes it from there.
11. Save, Export, recovery
Auto-save writes every change to Firestore (collection
vipconcierge_coords, one document per avatar) ~800ms after
you stop editing.
Save now forces an immediate flush.
Export downloads a JSON snapshot of the full map (draft
+ every saved override) for backup or hand-off.
Audit log: every write request is also recorded in
vipconcierge_coords_audit. If anything ever goes wrong, the
script tools/recover_avatar_1.py in the repo can replay the
log and restore the state from before any unwanted bulk write.
Wipe guard. The API refuses to clear an avatar's whole map
unless the request explicitly opts in (confirm_wipe: true).
Reset avatar uses this; nothing else can accidentally blow your work away.
12. "No draft pos" — what it means
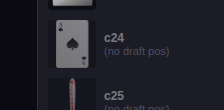
An accessory shown faded with (no draft pos) in the right rail has
no production placement on any avatar — there's no entry
for it in the historical 2D coord map.
Total: 14 accessories are in this state across hats and mouths
(h16, h24, h26, c24, c25, c34, c36, c37, c40, c41, c62, c63, c64, c65).
Their image files exist in static-data, but the team never assigned them
coordinates.
What the badge looks like in the accessory list: the entry is dimmed and shows "(no draft pos)".
What to do? Consult with @EPILock and @YanaMurr to find
out whether these accessories are still on sale. If they've been retired,
you don't have to position them. If they should ship: place one manually on
one avatar, then use Propagate across avatars with another
accessory in the same category as the reference (see §7). The new placement
will roll out to every avatar at once.
13. Tips & gotchas
Use the reference panel. The 200×200 preview on the
left of the stage shows the OLD 2D combo at its baked position.
That's your visual target — match the spirit of it on the new 3D avatar.
Position the first accessory really carefully. The
propagate feature only does as good a job as the anchor placement.
Spending an extra minute on the first hat saves an hour on the rest.
Saved overrides win over the draft. When the system
changes the auto-positioned draft (rare), your hand edits are unaffected
— they live in Firestore separately and layer on top.
Cache. If a recent change isn't visible, hard-refresh
(Ctrl+F5) or append ?v=anything to the URL.
Hover any button to see a tooltip describing exactly
what it does. Tooltips appear after a short pause.
The editor only works at desktop sizes. Mobile layouts
aren't supported — too many handles to fit comfortably.
 and pick All hats (or All accessories):